ReportPro's Design Interface
This chapter provides a brief overview of ReportPro's design interface. It's purpose is to familiarize you with the key components that are used to create a report.
The figure below shows ReportPro's design interface as it appears when creating a new report. The large outer window is ReportPro's shell window. The inner window is ReportPro's work window. You can open as many work windows as you have available memory. The advantage of having multiple work windows open is that you can copy objects from one work window to another thus simplifying the report creation process.
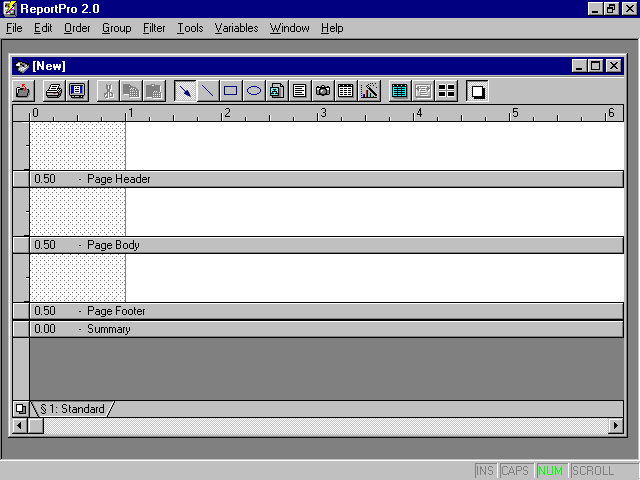
At the top of the shell window is the title bar which contains the text "ReportPro 2". Directly below the title bar is ReportPro's main menu. The menu is used to access the various options available in ReportPro.
At the top of the work window is another title bar. This title bar shows the file name of the report that is opened in the work window. When you create a new report and have not saved it yet, the text "[New]" is displayed in the title bar.
Underneath the work window title bar is ReportPro's toolbar. The toolbar allows quick access to frequently used ReportPro menu options. The toolbar contains the following options (from left to right): Close, Print, Print Preview, Cut, Copy, Paste, Arrow Tool, Line Tool, Rectangle Tool, Ellipse Tool, Field Tool, Text Tool, Picture Tool, Embedded Section Tool, Graph Tool, Grid Display Toggle, Grid Snap Toggle, Center Object Command and Proof Mode Toggle.
Below the toolbar is the ruler. The ruler indicates where on the report surface you are drawing or editing. The ruler can be displayed in either inches or centimeters and corresponds to the location that objects will print from the left edge of the paper.
The white area below the ruler is the report surface. On this surface you will place the objects which constitute the report. The light gray area on the left side of the report surface represents the left margin of the report. Margin sizes are configurable and you can always place objects in the margin area if desired.
The report surface is divided into bands. When you initially create a report four bands are displayed. The Page Header allows you to specify objects that will be printed on the top of every page. The Page Body is used to print information that constitute the body of the report. The Page Footer allows you to specify objects that are printed on the bottom of every page. The Summary band allows you to print summary information at the end of the report.
On the left side of the work window you will find the band ruler. The band ruler indicates the size of the band and identifies the vertical placement of objects in the band. It also contains controls that allow you to change the height of each band.
At the bottom of the band ruler is the Background Toggle Button. This button places the ReportPro work window in the background edit mode. When in the background mode, the bands shown in figure 1 are hidden and the Background Band is displayed.
To the right of the Background Toggle Button is the Section Tab Bar. The tab bar displays one tab for each section defined in the report. By default a report has one section, but as you add sections to your report, additional tabs will appear on the tab bar. You select a section by clicking its tab. When you do so the current section is hidden and the selected section is shown.
To the right and bottom of the work window are scroll bars. The scroll bars allow you to scroll the work window to display portions of the work area which are hidden. This is useful since the report surface is generally larger than the work window.
At the bottom of the main ReportPro window is the status bar. The status bar is used to display help information about menu and toolbar options.
Table of contents
-
Index
- Copyright
- Installation
- Getting Help
- ReportPro's Design Interface
- ReportPro's Menu System
- ReportPro's Shell Menu
- ReportPro's Work Window Menu
- ReportPro's Pop-up Menus
- ReportPro's Expression Builder
- Building Expressions
- Creating a Report
- Creating a Standard Report
- Creating a Label Report
- Creating a Cross-Tab Report
- Using an ODBC Data Source
- Report Wizards
- Standard Report Wizard
- Label Report Wizard
- Cross-Tab Report Wizard
- Opening a Report
- Saving a Report
- Configuring ReportPro
- Configuring a Report
- Configuring Sections
- Configuring Local Tables
- Configuring SQL Sources
- Configuring the Printer
- Bands
- Configuring Bands
- Drawing Tools
- Configuring Report Objects
- Align
- Set Size/Position
- Background Style
- Border Style
- Print When
- Shadowing
- Line Style
- Auto Size
- Font
- Text Align
- Field Style
- Picture Style
- Field Wizard
- Object Inspector
- Grouping
- Variables
- Print Preview
- Printing
- Abs()
- AddressBlk()
- Alltrim()
- Asc()
- At()
- AtNoCase()
- AtLineNum()
- AtLineNoCase()
- CDOW()
- Ceiling()
- Chr()
- CMonth()
- Cosine()
- Cotangent()
- CTOD()
- Day()
- Descend()
- DOW()
- DTOC()
- DTOS()
- ElapsedTime()
- Empty()
- GroupMembers()
- HardCR()
- HoursBetween()
- iif()
- Integer()
- IsAlpha()
- IsBetween()
- IsDigit()
- IsLower()
- IsUpper()
- Left()
- Len()
- Log()
- Lower()
- LTrim()
- Max()
- MakeDate()
- MakeTime()
- MemoLine()
- MemoTran()
- Min()
- MLCount()
- Modulus()
- MinutesBetween()
- Month()
- Num2CDOW()
- Num2CMonth()
- NumTrim()
- OccursIn()
- Pad()
- Power()
- PgCount()
- PgNo()
- Properize()
- Rand()
- RAt()
- Replicate()
- Right()
- Round()
- RpEOF()
- RpSQLCol()
- Sec2Days()
- Sine()
- Space()
- SqRt()
- Str()
- StrTran()
- Stuff()
- SubStr()
- Tangent()
- Time()
- Today()
- Trim()
- Upper()
- Val()
- Year()
- LightLib
- Database Drivers
- Appendices